Setup a P.V. Test Method (Basic)
This article describes how to configure a basic Performance Verification (P.V.) test method. The P.V. Method has one (1) testing wavelength for photometric accuracy. Example - if your target wavelength of use if 552nm for B3 film, you should a test wavelength close to 552nm (such as 546.1nm).
Instructions
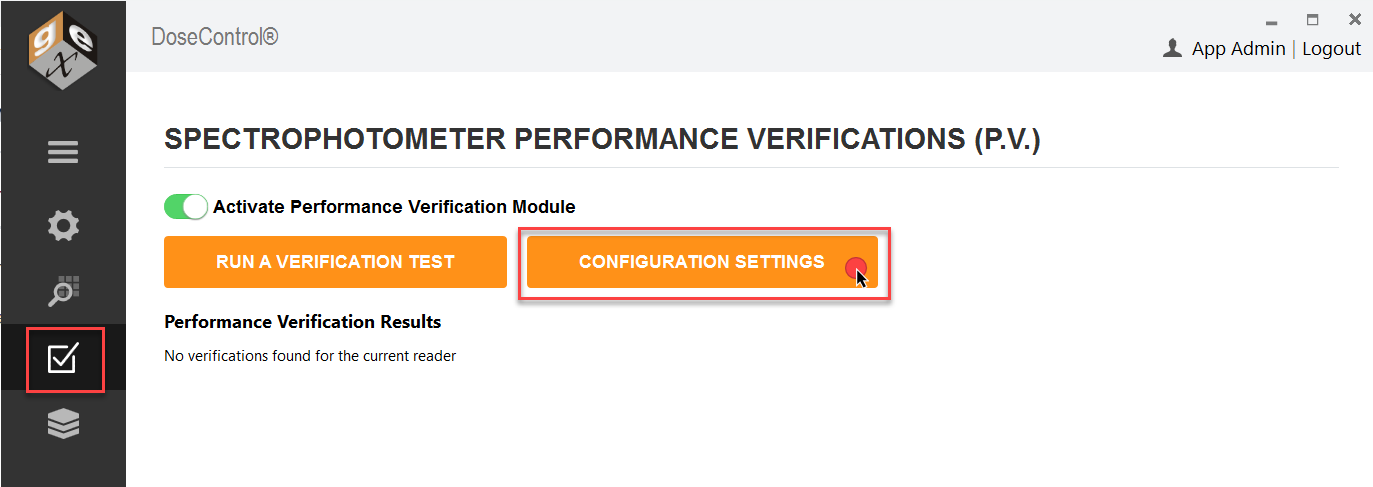
1 Login as the Application Administrator and click on the P.V. Module icon on the left menu bar to open the P.V. Module home screen.
2 Click the “Configuration Settings” button to go to the configuration screen.
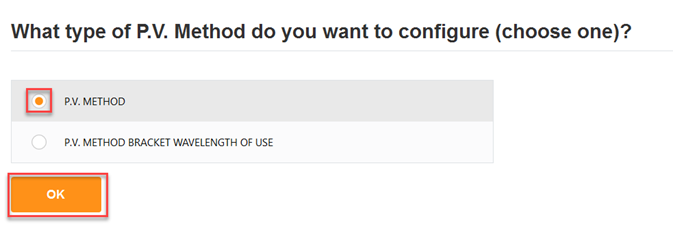
3 Click the “Add P.V. Test Config” button at the bottom of the screen.

4 Choose a P.V. Method test type. Select “P.V. Method” and click OK.
P.V. Method options
Setup P.V. Method, steps 5-9 below.
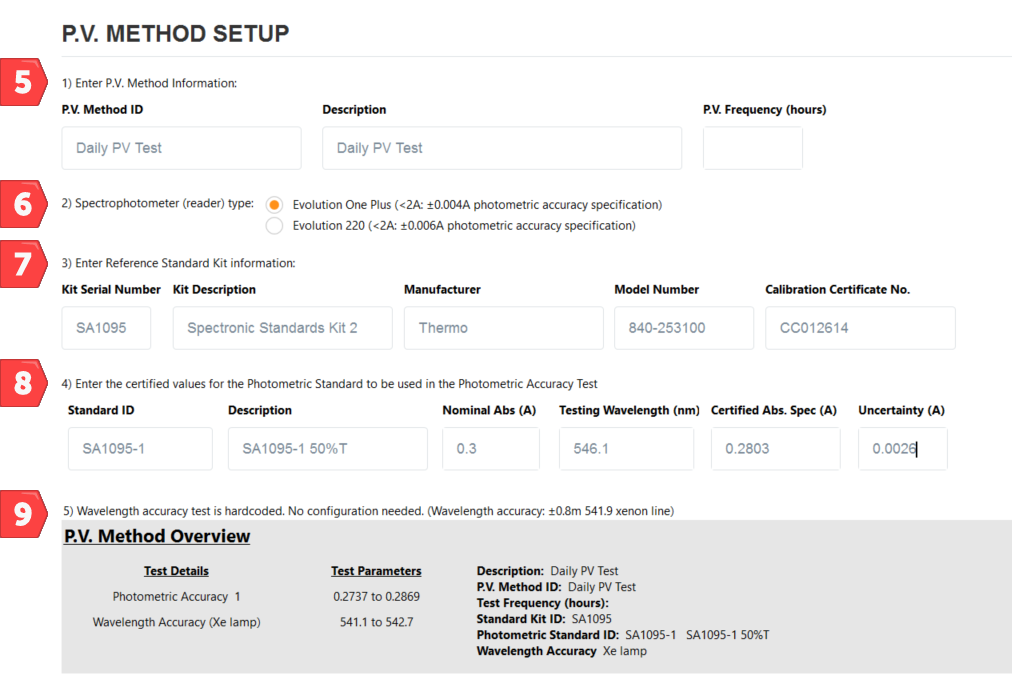
5 Enter the P.V. Method test information:
P.V. Method ID – Unique name or identifier for the P.V. test method. Example: Daily PV Test.
Description – Description for the P.V. Method. Example: Daily instrument performance check.
P.V. Frequency (hours) – When the number of hours expires, a message will pop-up “Reader requires P.V. testing. Do you want to do it now?” The software will not allow dosimeter measurements until a P.V. test is executed and gets a PASS result. Enter the number of hours for the test frequency timer, e.g. 24, 36, 48. Leave blank for on-demand P.V. testing.
IMPORTANT!
Before you setup frequency, read about P.V. Frequency setup and usage in the software: About P.V. test frequency.
6 Choose Spectrophotometer (reader) type: Select one option.
Evolution One Plus model spectrophotometer – DoseControl will use the photometric accuracy specification: <2A: ±0.004A
Evolution 220 model spectrophotometer - DoseControl will use the photometric accuracy specification: <2A: ±0.006A
7 Enter Reference Standard Kit information:
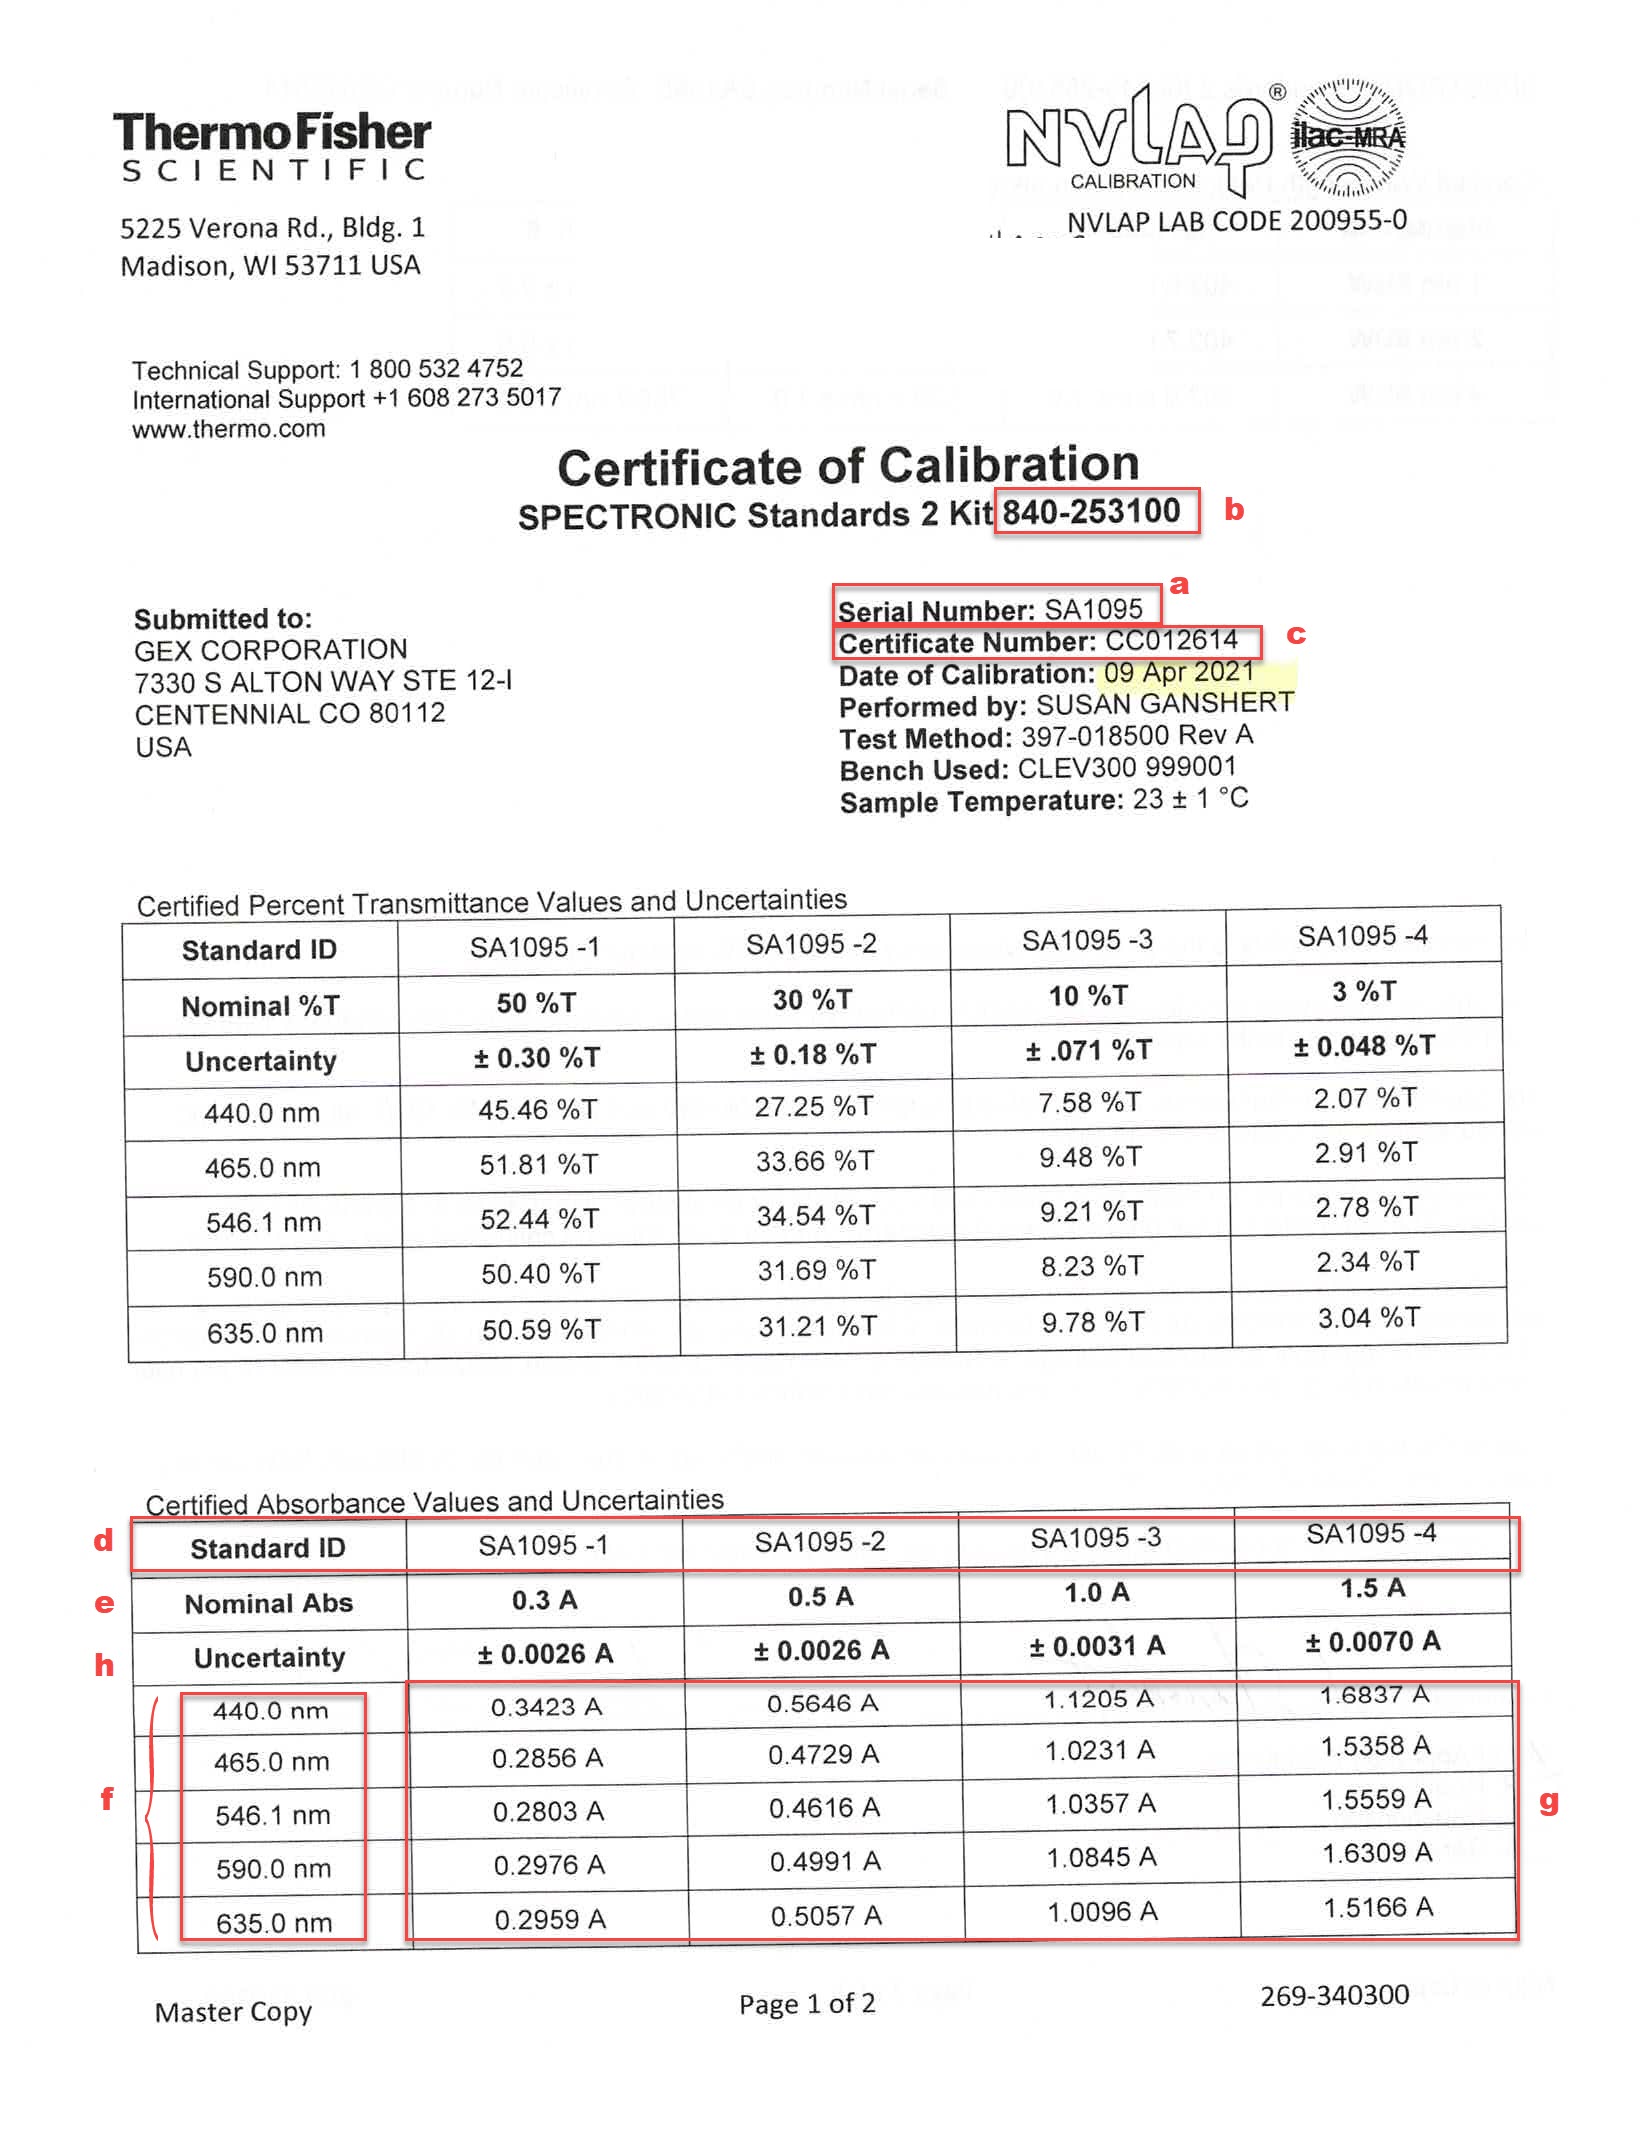
Kit Serial Number – Enter the photometric reference standards’ kit serial number. Example; SA1095. See item a below.
Kit Description – Description for the photometric reference standards’ kit. This should be easily identifiable by the user. Example: Spectronic Standards Kit 2, Device ID 006.
Manufacturer – Standards’ kit manufacturer. Example: Thermo.
Model Number – Standards’ kit model number. Example: 840-253100. See item b below.
Calibration Certificate No.: Standards’ kit calibration certificate number. Example: CC012614. See item c below.
8 Enter the certified values for the Photometric Standard to be used in the Photometric Accuracy Test:
Standard ID – Enter the Standard ID for the photometric standard to be used in the P.V. test. Example: SA1095-1. See item d above
Description – Description for the photometric standard to be used in the test. Example: SA1095-1 50%T Standard.
Nominal Absorbance – Enter the Nominal Abs. for the photometric Standard ID. Example: 0.3A. See item e above
Testing Wavelength (nm) – Enter the wavelength to be used in the P.V. test. Example: 546.1. See item f above
Certified Abs. Spec. (A) – Enter the certified absorbance specification for the photometric Standard ID from the calibration certificate. Example: 0.2803 See item g above
9 Confirm your setup - View the P.V. Method Overview.
Photometric Accuracy test parameters – DoseControl automatically calculates the test parameters for the Test Wavelength. See item h below.
Absorbance Spec Min = Certified value of Reference – (Reference Uncertainty + Evolution Specification for ABS accuracy)
Absorbance Spec Max = Certified Value of Reference + (Reference Uncertainty + Evolution Specification for ABS accuracy)
Wavelength Accuracy test parameters – Hardcoded in DoseControl. No configuration.
541.1 to 542.7 nm = wavelength accuracy test parameters. The software locates the peak near 541.9nm of the internal xenon lamp, and repeats the test three (3) times. The wavelength accuracy test parameters are defined by the published Thermo Evolution spectrophotometer specification for wavelength accuracy.
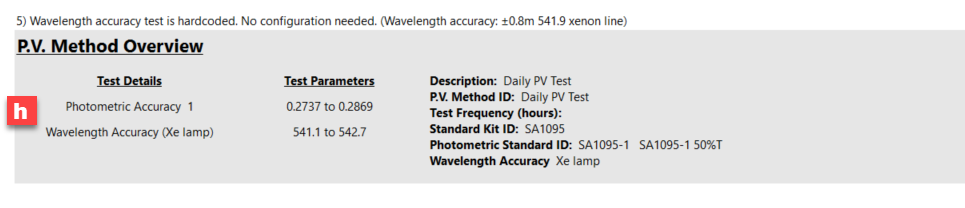
P.V. Method Overview section displays the test parameters.
10 Click Save to complete PV Method setup.
11 Make the PV Method “active” and “default” in the software, as needed.

👉 Related Articles
About the Performance Verification (P.V.) Module
Configure a P.V. test method (bracket wavelength of use)